I am working on an On Assignment post for later this week, but photographer John Keatley has an OA post up right now.
In it, he details his portrait of writer/director Josh Hornbeck. It's a nice walk-thru on building depth and character with light -- in a small room with light walls. Lord knows we see enough of those. At least the guy was not assigned to be shot working at a computer.
Had a chance to meet and have lunch with John in Seattle last week, where he showed me two of his city's great attractions -- fresh seafood and The Gum Wall.
One was yummy. The other, um, not so much.
-30-
FYI: DIY RPCube PDQ
Do you have one of those new RadioPopper JrX "Studio" model receivers? Tired of waiting for the upcoming RPCube, so you can remotely control Nikon flash power levels?
There is a lively discussion on how to roll your own (pretty easily and cheaply) happening in the Strobist Flickr group discussion board.
All you need is an SC-17 or a multi-flash sync cord (or generic equivalents of either) and a stereo miniplug. (And just one $10.50 multi-flash cord will make two "cubes".)
(Photo: azreloaded)
Boot Camp 2, Assignment 4: Results
Greetings from the final assignment of Boot Camp 2, in which you were asked to examine a transportation theme in the assignment, "What Moves You."
Some really nice stuff came in on this one, and I left notes on about two dozen pictures among the entries. Now comes the hard part -- getting them down to the finalists -- and one winner.
__________
But First, a Brief Commercial Message
No, not one of those pre-roll video things Vanity Fair forces you to sit through before you watch an Annie BTS. No, this commercial was shot by our own Ken Brown, for the Blackhawk (Car) Museum near San Francisco. Ken's the guy that did that amazing gull wing pic a ways back:
Pretty neat concept -- and shot on a 5D Mk II.
And Now, the Finalists
Add an extra "n" to lighting and things start to get even more interesting. Reader Carl Williams not only had the nerve to risk getting fried, but knew when to say when on the lighting.
Dark car, dark sky -- it's a low key pic, left that way. I might have popped a little light on the ground behind the car (a ways back) to separate the tires and sides a little.
But when the weather gets like this, I am probably at home hiding in the basement anyway. So what do I know.
This one, by M. W. Scott, is just delicious. It's an antique Polish scooter, with both paint and lighting to die for. Really nice composition, and the light details the bike's shape and texture beautifully.
One SB-80, through a shower curtain, proving that a modicum of creativity will let you do a lot with a little.
Saw a few of these, and BookGuy's was my favorite. It's understated, he let the car lights handle the road, nice sharp face -- a lot going on in a graphically arresting photo.
There are actually two light sources hitting the face. Two Sto-Fen'd SB-600's -- one on the far left dash and another in the passenger's seat. And those dual light sources give it a nice, 3-D shape.
Alex Pounds left significant areas of this photo unlit -- which to me makes the photo from a lighting perspective. Little snoot above the hands to augment the ambient window light coming from camera right, and even a flash under the sheets to paint a little detail from there.
I might have kissed a little more up into the face, but that could also have killed the draw of her overall body attitude, too. Wouldn't know till I saw it.
But in the end, this photo was not about lighting technique. It let the interpretation of the theme shine instead. Very nice, Alex.
(As an aside, you sure as heck won't catch me necked under a sheet with a Yongnuo YN460. After seeing this video, I would not put my nuggies anywhere near one of those demon-possessed things.)
This one is subtle, and I like it.
R.J. Bledsoe used a ground-mounted Vivitar 285 behind the biker to ape a little low, late light. This was essentially a dynamic landscape, but it fit the theme in its own way and stove out in the bunch.
I like that R. J. left the tones low and did not let the light call attention to itself. It is so easy to keep going and make the photo about the light, but adding more lighting pizzazz is not always the path to a better photo.
A little less subtle is this surfer photo by Haristobald, whom you may remember from this very cool swimming pool video.
The flash is actually on the board, in several layers of plastic bags. It made for a beautiful image when that light mixed with the sunset and waves. Please take a moment to check out his set from the shoot, in which he includes a setup shot.
Even less subtle is this shot by Darren Chang, who details cars in Malaysia. He shot two photos -- one with the hood down and one hood up -- and erased the former to the latter using layers in Photoshop.
I tried the same thing with my Scion XA and it's power source, but the two chipmunks under the hood did not photograph so well. (They are pretty dark and greased up by now.)
Seriously, how much money could you make shooting cars for hot rodders and tuners this way?
My 8-year-old described it in one word: Want.
And the Winner Is . . .
I loved every single one of these finalists -- beautiful photos, all. But only one walks home with the starving student light kit, a Speedlight Prokit 6 Reflector kit, the Strobist Gel/LumiQuest FXtra combo kit, a set of Strobist DVDs, the Trade Secret cards.
There was one photo that I kept going back to: This one.
Bounceman: A Hero For Our TIme.
Editing through the results for Boot Camp 2, Assignment 4, which will be up on Monday. (Some nice stuff in there!)
In the meantime, this is one of the video entries in LIME's ongoing "Bounce Competition," which you can learn more about here.
And, um, thanks for not making those pants any tighter.
[UPDATE: At some point, the guy who played Bounceman is gonna be walking down the street in Belgium somewhere and someone is gonna come up to him and ask, "Are you Bounceman?"
Bonus points if he stares at them for a moment, turns his head sharply and gallops away . . .]
-30-
Light is Not Your Problem.
Here's a little news flash for the majority of the people reading this site right now -- yours truly included:
Your lighting is probably not what is holding you back. A trained monkey can learn how to light. It is the stuff which your lighting is supposed to be secondary to that is holding you back.
It is your ideas -- or lack of them -- that is holding you back. Ditto, your ability to create a moment within the environment of all of that nifty light you have set up.
Who or what are you going to shoot? How are you going to approach it? Why? How are you going to create the personal intersection between subject and photographer that allows for even the possibility of a great photo to happen? How can you coax a moment of visual candor out of them?
That, for me, is the hard part.
So when I see a video of a photographer whom I really respect talking holistically about what goes into his or her photography, I am gonna watch it. Repeatedly. Even more so when the photographer in question is Dan Winters, my favorite photographer working today.
This video really got me thinking on several levels. But I would be curious to know how it caused you to think about your approach, too. So I want to open the comments up to that.
This interview is from FLYP, a wonderfully diverse multimedia magazine, of which you can see more here. And if you are not familiar with Dan Winters, his website is here.
-30-
Debuting Today: Best Camera
Ed. Note: Today's post has nothing to do with flash. But if you are a photographer who uses an iPhone, I'm pretty sure you're gonna like it.
Hit the jump for more on Chase Jarvis' new app: "The Best Camera" ...
__________
As if continually bouncing from one advertising campaign to the next weren't enough, Seattle photographer Chase Jarvis and his folks also have been hard at work creating the sweetest iPhone app yet for photographers.
I have been watching thatsneaky little bast guy cranking out all of those cool, artsy photos with his phone and wondering why the hell my phone wouldn't make photos like that. Turns out, he was playing with a juiced ball. (Well, plus he is a better photographer than I am.)
I got to play with it in Seattle this last weekend and it rocks. Long story short, it gives you creative control over your iPhone photos like never before, with lots of stackable filters that you can apply to your images right in the phone.
As if that is not enough, there is also instant, one-button sharing of your images with all of the popular social media platforms -- and a dedicated, real-time site which showcases a stream of all of the tweaked images as they swim up into the web.
Not a bad deal for three clams.
He's even created an art photography book just to show what is possible with an iPhone, the right software and way too many copies of the creativity gene.
My first reaction: Why didn't I think of that?
Congrats to Chase. Best Camera is a fantastic idea, beautifully executed. Full info at Chase's blog.
Hit the jump for more on Chase Jarvis' new app: "The Best Camera" ...
__________
As if continually bouncing from one advertising campaign to the next weren't enough, Seattle photographer Chase Jarvis and his folks also have been hard at work creating the sweetest iPhone app yet for photographers.
I have been watching that
I got to play with it in Seattle this last weekend and it rocks. Long story short, it gives you creative control over your iPhone photos like never before, with lots of stackable filters that you can apply to your images right in the phone.
As if that is not enough, there is also instant, one-button sharing of your images with all of the popular social media platforms -- and a dedicated, real-time site which showcases a stream of all of the tweaked images as they swim up into the web.
Not a bad deal for three clams.
He's even created an art photography book just to show what is possible with an iPhone, the right software and way too many copies of the creativity gene.
My first reaction: Why didn't I think of that?
Congrats to Chase. Best Camera is a fantastic idea, beautifully executed. Full info at Chase's blog.
Back in The Day...
We used to have to walk five miles to school and back. Barefoot. In the snow. Uphill. Both ways.
I'm just kidding -- we had shoes.
But while you are finishing up your Boot Camp shots (which, by the way, are due today) howzabout a little inspiration from back in the '80's, when we didn't have no hotshot digital cameras?
Take this pan shot of a Yamaha bike, for instance, the original of which is absolutely perfect despite the crappy video screen grab version seen above.
What if I told you this was done on an 8x10 view camera -- using just four small quartz lights -- and no Photoshop, either.
Hit the jump to watch it happen via two, ten-minute videos.
__________
Today: A Full, Dean Collins Shoot
I have said before and I will say again that there is no better source for learning how to create sophisticated light than by studying work of Dean Collins. Through the wide range of shoots on his Best of Dean Collins DVDs, he shows you example after example of how seemingly impossible lighting challenges can be broken down into a series of small, solvable problems.
Are you ever gonna be asked to shoot a speeding motorcycle with an 8x10 view camera without Photoshop? Not likely.
But the point is, this is just another problem that can be solved with a thorough understanding of the principles of lighting. And if you understand those principles, you can solve -- or reverse engineer -- just about anything you come across, with ease.
So, how do you perfectly pan a fast-moving bike with an eight-by-frickin'-ten view camera?
Simple: You don't, because the bike is not moving. In fact, the bike is the only thing in the frame that is staying completely still.
The beauty of watching problem-solving at high-end levels is that your challenges start to become ridiculously easy by comparison. Which is one reason I recommend his educational materials so strongly.
And today, a big 'thank you' to the folks at Software Cinema for porting one of the twenty shoots on the 'best of' DVDs to YouTube in its entirety.
Its 20 minutes long, and shows how Collins handles such problems as creating the illusion of speed where none exists, getting highlights on the dull, black tires and creating absolutely perfect specular highlights before Photoshop.
And, IMO, the best things about these types of shoots is not that they teach you how to solve a specific set of problems. It is that they make you realize that you can learn to light anything.
So, without further yakkin':
Part 2:
You can see more -- including another video of a more down-to-earth shoot, at Software Cinema: The Best of Dean Collins on Lighting.
Night Shuttle
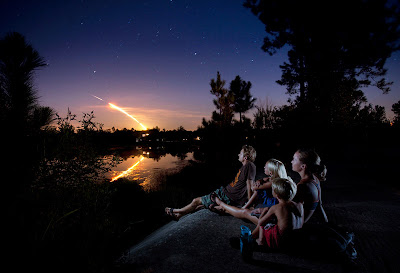
Florida-based photographer Jon. M. Fletcher took advantage of a recent shuttle launch to make a unique family portrait. Obviously, you only get one shot in a situation like this. But Jon had a few tricks up his sleeve to make his odds a little better.
Jon's walk-thru, inside.
__________
Sez Jon:
It was really a spur of the moment shoot.
My wife (at right in photo) was online and noticed the shuttle was launching in about an hour. I stepped outside to see how the weather looked and saw a wonderfully clear sky. My daughter and I started looking for places to shoot in my neighborhood and thought of the pond because of the wide expanse of water (no trees to block the view and the possibility of a reflection).
After slogging through some mud in the dark to get to a concrete bank overlooking the pond, I set up my 5d Mark II on a tripod and put two SB-800s on PocketWizards on camera right and left. When we saw the glow of the shuttle below the tree line, I took three 30 second exposures at f/8, ISO 800 (without the strobes firing) in immediate succession as the flame trail rose above the horizon. Then I put the camera on timer, turned the Pocket Wizard transmitter on, and ran to be with my family to expose an image of us and watch the last little blip of the shuttle disappear behind a bank of pines to the northeast.
I processed all the files in Lightroom and plopped them on top of eachother using a screen blending mode in PhotoShop. That's the workaround I use to do multiple exposures since most DSLRs (including the 5D) won't do them in-camera.
Family portraits are always the hardest for me, so I was overjoyed to get both the shuttle and my 'ohana in the same frame. As far as the shuttle coming up in exactly the right place, that was a gift. I knew it would come up somewhere in that vicinity, but when I saw it lining up the way it did, I had to stop and give thanks.
__________
Fletcher is a staff photographer for the Florida Times-Union. Like photographer Peter Yang, who cut his teeth shooting for the Austin American-Statesman, Fletcher is constantly working to expand the boundaries of newspaper photography.
Any staff PJ feeling constricted and beaten down by The Man need only look to Fletcher's portfolio for inspiration.
World Debut: Hypernova Music Vid, Shot with Flash at 10 FPS
At 10 FPS, the burst rate of the Canon 1D Mk III takes on almost a Tim Burton-like quality when shown as a movie -- a technique any sports shooter has seen while scanning through multi-frame bursts in Photo Mechanic.
Iranian crunch band Hypernova and director Richard Patterson married the fast motor drive of the camera with the Profoto Pro-8a Air, the Uzi-inspired studio strobe which can keep up with just about anything out there. (Actually, they used a whole slew of Pro8a's. Must be nice.)
First the behind-the-scenes video above, which gives a little look into how they did it. Then hit the jump for the final product and some background on why in the world anyone would want to do this sort of thing in the first place.
[NOTE: The music video is very intense, and deals with themes of religious intolerance and torture. And while the ten-FPS strobed technique marries perfectly with the subject matter, you cubicle slaves might want to turn the sound down a little and/or wait till the office killjoy hits the coffee machine. ]
__________
The Result:
This is the first time this has been shown anywhere, which technically means that you are at a world premiere right now. And the whole thing kinda has a "Jacob's Ladder" feel to it, IMO. (Loved that movie.)
But why not just use a 5D Mk II and do it Laforet style?
Well for starters, you would need an insane amount of continuous light to push lumens that far into a scene. Using flash as a quasi-continuous light source lets you employ the same techniques to balance your flash with your ambient that we do for still photos. (The vid is, technically, 16,000 still photos.) That is something you could not do if all of the light sources were of the true, continuous variety.
Since you are turning the flash into essentially a continuous light source with the stop-motion technique, you end up with two kinds of "ambient" and a boatload of control between the two.
The flash generators are the same water-cooled, belt-fed machine guns that Annie used for the Profoto Anniversary shoot. Much more tech info on this whole process in available a special page at Profoto.
On a side note, I am digging that song, "Universal," in the BTS vid. I am a big Bloc Party fan, and I am definitely hearing some influence in there.
For more on the band and the director visit Hypernova on Myspace or Patterson's website.
__________
RELATED :: Annie Shoots Conny Dufgran ::
Robert Seale: Life in the Fast Lane
Sports portrait specialist Robert Seale had four whole minutes to shoot this portrait of cycling deity Lance Armstrong in the basement of an Austin, TX bike shop.
Which begs the question: "What's he gonna do with all of that spare time when he finishes early?"
Why, shoot three more setups, of course.
Check out Robert's very RSS-worthy blog for the speed-lighting (heh) walk-thru, and lots of other cool stuff.
Top notch.
-30-
Which begs the question: "What's he gonna do with all of that spare time when he finishes early?"
Why, shoot three more setups, of course.
Check out Robert's very RSS-worthy blog for the speed-lighting (heh) walk-thru, and lots of other cool stuff.
Top notch.
-30-
Hot off the Presses: Strobist OCF Magnets
With apologies to the Obsessive Compulsive Foundation, the Oregon Country Fair, the Ohio Football Club and the Olympic Credit Fund (among many others) the Strobist "OCF" magnets are now available.
The OCF stands for Off Camera Flash. Yeah, it's a little Dan Brown-ish. But we thought a rather fitting three-letter airport code thingie, all things considered.
They are not for sale -- but there are several ways in which you can score one for free. Deets inside.
__________
The Plan
Earlier this summer, I was looking for a way to have a little fun with part of my budget. Long story short, I dropped a thousand bucks on just over 75 pounds worth of Euro-style "oval" magnets.
Main reasoning being, "Why not?"
Being long on impulse and short on detailed follow-through, the hard part would now be to figure out how to get them out to people.
Sweatshop Ben and Emily, Inc., serving as order fulfillment?
Nope. We can't even get them to clean their rooms.
SASE's coming to the house for the next year from all over the globe?
Um, no.
So I thought it much easier (and way more fun) to just give them away. I divided the lot into five sections and we are scattering them to the winds.
How to Get One
There are three ways to score one, and all are free. (And only one way requires a purchase of any kind.)
The easiest way -- and the way in which you have the best chance -- is to make any purchase from Midwest Photo Exchange. (While supplies last -- and I would not wait too long on this option.)
They have been an incredible supporter of the site and all that goes on here, so I wanted to say thanks to the people who support them.
MPEX has even created several new products specifically for the readers of this site. So the path of least magnetic resistance goes to those of you who are supporting them -- and, by extension, the site itself. And thanks, by the way.
[UPDATE: Getting reports that MPEX may be out, as of 10/5/09. Please call to check, if the mag is important to you!]
While supplies last (and they got a pile of them) type in OCF as a promotional code at checkout on any purchase. Check your list of items to make sure it took. It should be cryptically obvious.
Another Way
The second easiest way to get one for free is a cakewalk, if you happen to attend Photo Plus Expo this October in New York. They will be available -- but not visible -- in at least three booths. There will be a code word involved, 'cause we don't want these going to just anybody with a fridge or a car to accessorize, right?
More on that later, when we get closer to Photo Plus.
The Most Challenging Way
View Strobist OCF Magnet locations in a larger map
I (as well as a certain number of people on my behalf) am simply going to start leaving them in publicly accessible locations. Obviously, the Baltimore-Washington corridor is gonna get some love because that is home base for me. But I travel a fair bit too. In fact, I have two trips planned within the next two weeks, and I will be leaving a trail of
There are people helping from around the country and the globe, too. So the magnets could show up literally anywhere. How will you know when a magnet has been placed somewhere in your area?
That's easy. I'll tweet it on Twitter -- specific location and all. And if whoever finds it first sends me an "@strobist" tweet, I also will let people know that it has been found. So if you want to get OCF updates make sure to follow @Strobist on Twitter.
It is free and easy, and there are a whole bunch of cool photog-types there worth following. More on that later.
My goal here is to really spread these things around the world and see what happens. I have some ideas, and this will be an ongoing project with some cool surprises.
One Last Thing
There are exactly 1,000 magnets (assuming we do not repeat it) to be dispersed about the entire planet. Which means that there is a pretty small chance you will ever see another one on someone else's car.
If you ever see one, please don't be a jerk and steal it. Seriously, that would be so counter to the whole thing.
But just to let them know you could have easily stolen it, turn it upside down. You keep the good karma and they get a little creeped out.
This should be lots of fun, depending on where we can get the magnets dispersed to. And for those of you who choose to support the site's sponsors as a way of getting yours, many thanks. You make this whole thing happen.
On Assignment: Haloti Ngata
After a long summer, NFL Football finally lights up again this weekend. And one of my favorite players is Baltimore defensive tackle Haloti Ngata.
I got to photograph him as a rookie shortly before his first-ever start as a Raven in 2006. It was for a feature, and ran lead on A-1 the day he made his NFL debut. I had a few minutes to shoot him in full sun after a long practice, so I knew I would need to knock out the sun to build up some decent light.
My first thought upon seeing the 6'4", 345 behemoth:
"We're gonna need a bigger gobo …"
__________
One of my first instincts when shooting a daytime portrait in full sun is to get rid of the sun. And since I live in the northern hemisphere, the best place to find a large spot of shade is always on the north side of a building. The sky is full daylight, of course, so exposing for it (or a little down, as I did here) will give you a nice, dark subject on which to add light.
The light in this case was my well-worn White Lightning 600, which was forever my go-to light for overpowering sun. Still, it is not powerful enough to beat sun at any real distance, so I tend to work in close.
When working in close, you also do not have to use a huge modifier to get decent quality portrait light. For that reason I chose a beauty dish, which gave me the added advantage of being fairly resistant to the wind.
[TIP: When shooting a sequoia-sized NFL lineman, probably better not to refer to your light as a "beauty dish."]
Actually, no worries in Ngata's case. He was super nice to me even after a long practice. And those 300-lb+ lineman take a beating in the late summer heat.
Shooting lit in the sun is like what they do to Marines at boot camp: Knock 'em down, and build 'em back up. And putting your subject in shade gives you total control over the ratio between ambient-lit sky and strobe-lit subject.
The Game Plan
Get your subject in shade. Start at a 250th of a second o get your most flash-friendly aperture at which you can sync a full-pop flash. Then choose the aperture that gives you the best looking background.
Now, adjust the distance and/or power level on the flash until you have a properly exposed subject and you are good to go. It is a very quick process, and no flash meter is needed.
Study the Films
This is a very interesting photo for me to look back at, because it illustrates the lighting learning curve that has developed on the web in the last three years. In short, when I took this photo I loved it -- in large part because of the light.
Now, while I still like the photo, all I see is missed opportunities.
There are so many things I could have -- should have -- done that would have amped this photo. Even by adding just one SB-800 speedlight, which I am 100% sure I stupidly had sitting idle in my waist pack, I had a couple of cool options.
One, I could have simply stuck it on the hot shoe for a little on-axis fill. Without a background to catch the hard shadow, an on-camera flash can work great against off-camera light. Here's an example.
But even better, I could have just stuck the flash on the ground (camera right) just behind Ngata, aimed straight up, to throw some cool uplight into his massive arms. Start with the flash on full power, zoomed to 105mm to control spill and max out the lumens. Then quickly dial it down to where you want after one visual test.
And don't even get me started on two speedlights as kickers. You could combine the two add-ons above, or throw both flashes on the ground behind Ngata (one on each side). Each solution would have looked way better than the shot up top, and totally different from each other.
Flat Foreheads of the World, Unite!
It's like McNally says, you whack your forehead with your palm enough times while thinking of what you shoulda done, and it can get pretty flat.
But your lighting gets better.
OLDC: More Fun than Diagramming Sentences
Not everyone has access to their own in-house team of professional illustrators to create stunningly beautiful lighting diagrams.
For those of you who have not been following the Flickr threads, Strobist reader Quoc Huy Nguyen Dinh has been developing an online lighting diagram creator, and it is ready for prime time. You can either do it on-the-fly in the browser-based version, or download a Photoshop file to get serious on your desktop.
And best of all, it's free.
(Check it out here.)
-30-
Boot Camp 2, Assignment #4: What Moves You
Summer may have unofficially ended yesterday (no more white belts or manscaping for me) but we still have one more assignment to get through for Boot Camp 2.
Being strong believers in delayed gratification, I think I can safely speak for the entire staff here at Strobist International HQ when I say we tried to save the best assignment for last.
__________
Your Assignment, Should You Decide to Accept It...
This one, as you might have gathered from the post header, is about transportation -- literally, what moves you.
It's been a popular theme in the Strobist Flickr Pool for the last three years. So I thought it fitting to give some of you a chance to show off a little.
I'd like to point out that the photo above is of my own car in my own garage.
I'd like to point that out. But, sadly, I cannot. I wish those were my wheels. (Click through on that or any other pic in this post to get to the rightful Strobist group photog.)
Three vehicles comprise the actual real-life Strobist corporate fleet. The human-powered division is a 2004 Trek 430 hard-tail mountain bike. It was purchased used in a stunning stroke of good luck, given my ridiculously short frame size.
The internal combustion division of the fleet consists of a pair of 2006 vehicles -- a Scion XA and a used Yamaha Vino 49.5cc scooter. The combined mileage for the above is slightly over 69 MPG, I might add.
The point being that any of these types of vehicles would eligible for this assignment. Stretch it a little.
Use this as an excuse to get a little creative, as this assignment will not be nearly as constrained as the previous three. But try to keep the subject matter to an object which could reasonably be classified as transportation.
And, red sports car photo notwithstanding, try to remember that the assignment will not be judged on the hotness of the vehicle. In fact, if you do scrounge up a killer car, the onus will be on you to make an extra hot picture.
How You Can Help
If you are looking for the charitable component, this one is kinda no-brainer. Not only could you help someone sell a hot ride, but you could pretty much pick out exactly the vehicle you might like to photograph, sans any modeling fees.
In the US, I would suggest checking out the "used searches" in cars.com. If you don't have your own car to shoot, you might make a seller very happy with a cool photo (or group of photos) of their car. Plus, it'd make a nice keepsake after the car is gone. Just an idea.
Prizes, We Gots Prizes
Midwest Photo Exchange went a little nuts on this one, so we're pretty much throwing in everything but the kitchen sync.
For starters, how 'bout an LP120-based starving student light kit, a Speedlight Prokit 6 Reflector, and a new special Strobist Gel / LumiQuest FXtra combo kit.
And, as with the other prize packs, a set of Strobist DVDs and a set of Trade Secret Strobist lighting cards round out the package.
Remember, this is the last assignment and thus the last chance to shoot yourself into a pretty cool swag bag.
And, as the person coughing up for all of this international postage lately, I would like to point out that after the first three assignments the score is now:
Shifty-Eyed Foreigners: 3
U.S. Photogs: El Zippo.
(Kinda like watching World Cup Football qualifiers, no?)
Just sayin'.
The Fine Print
Because someone asks in the comments every single time, please refer back to the first assignment post for the basic info on how to enter your photo and where to go if you have Flickr problems questions.
But PLEASE NOTE that the tag is different for this assignment. It is:
SBC2ASSIGN4
So don't screw up and repeat the tag from the first assignment. The photo must also be in the Strobist pool (so remember to add that lighting info) to be entered. If you are successful, your photos should appear in this search within a few minutes. Please, only submit one entry.
If you want to ask questions, or otherwise discuss this assignment, you can do so in this thread.
And you can check out some of the other bloggers following along, here.
The due date for this assignment is end of day, local time, September 21st, 2009. Don't be late.
And for the verification shot (which will be required of the winner to prove he or she took it after the assignment date) reach around that camera and make a second version of the same shot with your hand showing four fingers in the foreground.
You know, just to keep it legal.
DVDs are Back In
After being out of stock, the fifth printing of the Strobist Lighting DVDs (more here) is in and now shipping.
I am happy to report that, in addition to the US and UK/EU outlets, they are now available from Dubai in the UAE. This reduces shipping charges for those of you in the Middle East, Asia and AU/NZ.
-30-
I am happy to report that, in addition to the US and UK/EU outlets, they are now available from Dubai in the UAE. This reduces shipping charges for those of you in the Middle East, Asia and AU/NZ.
-30-
"But I Just Work at a Small Newspaper…"
Twenty one plus years ago I arrived in Columbia, MD, to start work as a staff PJ at Patuxent Publishing, a chain of community tabloid newspapers. Like most of the rest of the staff, I was young and full of piss and vinegar.
One thing I loved about working there is that we never let our size be a ceiling to what we wanted to do creatively. Staff shooter Matt Roth is carrying on that tradition there today, and I just came across a portrait series of standout high school athletes from this past spring season.
I am working up the final Boot Camp assignment post today. But in the interim, stop by Matt's blog and check out his pix for those could've-been-boring end of year feature stories.
If you are trudging through your high school sports shooting season, these should be sufficient to get you off of your butt. Kickass.
-30-
Annie / Mad Men BTS Video
[UPDATE: Even though the "autoStart" tag in the embedded video is set to "false," the vid seems to be auto-starting anyway. Apologies to the clandestine viewers locked in their cubicles. I am placing the video and the rest of the post behind a "read more" jump to give you a chance to turn the sound down.
Any further flash coding tech help mucho appreciated!]
__________
If you saw Vanity Fair's Mad Men spread in the current issue, here's a quick behind-the-scenes video of Annie Leibovitz shooting it. (After the obligatory pre-roll ad, of course.)
Just a little bit of lighting seen in this one, and she's mostly aping ambient with the Photek Soft-Liter and a voice-activated boom again. Balance-wise, she is more fine-tuning the quality of the ambient than overpowering it. And the result is both subtle and beautiful.
As for your Labor Day weekend, rest assured it is probably more relaxing than Annie's. She has a $24,000,000.00 debt payment due Tuesday. I'd roll that baby forward to a new Southwest Airlines Rapid Rewards card and fly free for-EVER.
__________
[UPDATE: Oops. Annie's weekend just got worse...]
__________
(Thanks to Sean for the tip.)
Lord of the Ring Flash
[EDITOR'S NOTE: Okay, so maybe that's a stretch. This guy doesn't even use ring flash. But I had Headline Writer's Block and it was the only thing I could come up with. Best me in the comments.]
__________
"I immediately knew I wanted to look into the dark barn and not work against the huge, open bay door. The light outside that door was, like, ƒ/32,000, and the light inside was a weak ƒ/1.4 at best.
I’m not gonna fight city hall here. Where I am looking is dark, but dark I can light.
Dark I can control. I like the dark. Yessss, my precious..."
__________
Quoth Joe McNally, in a nice, long OA-style piece in Digital Photo Pro. It is Nikon CLS-centric, but still worth a read to anyone interested in lighting in general.
-30-
__________
"I immediately knew I wanted to look into the dark barn and not work against the huge, open bay door. The light outside that door was, like, ƒ/32,000, and the light inside was a weak ƒ/1.4 at best.
I’m not gonna fight city hall here. Where I am looking is dark, but dark I can light.
Dark I can control. I like the dark. Yessss, my precious..."
__________
Quoth Joe McNally, in a nice, long OA-style piece in Digital Photo Pro. It is Nikon CLS-centric, but still worth a read to anyone interested in lighting in general.
-30-
Q&A: Popping a Cold One
From the comments on Monday's OA post, Gavin asks:
"I love the macro shots and your explanation, but since everyone is going to talk about those, I'll throw out a different question. The shot through the window is also very successful. Did you do any gelling there, or is that all existing room light?"
Thank you, Gavin.
And actually that shot is lit entirely by flash. Or rather, flashes -- four, to be exact -- and every one is gelled. Diagram and walk-thru, inside.
__________
We were shooting each of the scientists and students working with the halophiles in this particular lab at the Center of Marine Biology in Baltimore.
I photographed Valerie working in a "refrigerated incubator," which is not a bad place to be in Baltimore in August.
I wanted to show temperature as a visual element, and the classic way to do that is to use cooled-down color temperature in your lights. This is where the CTB (color temperature blue) gels come in very handy, as not only do they come in relative strengths but are perfectly offset by the corresponding CTO (color temperature orange) gels.
So, to show temperature differential I would "blue" the inside of the fridge. As a contrasting color, and to make the blue stand out, I decided to use a corresponding warming gel on the outside.
This is where one of the Strobist gel packs can come in handy. They give you that set in quarter, half and full strength. Not exactly being a subtle guy, I went with full. But I could have nuanced this as much or as little as I wanted, were I one of yer more sophisticated types.
In addition to the warm vs. cool thing, I also had to shoot through the window without seeing my own reflection. This would be a little tricky as the window was small and I would also be lit by the exterior light.
So, I fired the (CTO'd) outside light from over my right shoulder, and shot diagonally through the window. Both of these served to kill my reflection in the glass. The outside light was also snooted, to put a little gradient in the door as the outside corners fell out of the beam.
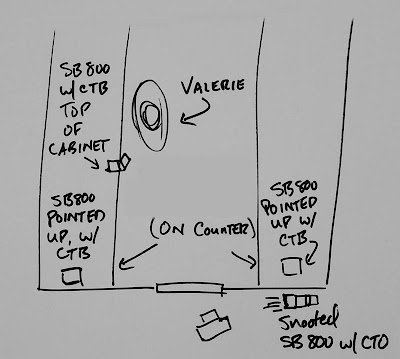
Here is the diagram:
Inside, I wanted the whole room to be a contrasting, cool color. So I lit it with two speedlights with full CTB gels. Nothing fancy -- just sat them on the waist-high counter tops next to the near inside wall and bounced them off of the ceiling.
This got the effective light source (now, the ceiling) far enough away to light the room pretty evenly. I lit the room to about one stop down. Then I stuck inside flash #3 on top of the upper cabinet on the left and pointed it down, to add a light to Valerie.
Being as the room is already lit up to only one stop down from this little spot light, it is very subtle. But it does clean her up, light wise.
This light is also CTB'd, which keeps the full color of the interior consistent. But I did do a quick little cheat in post, lassoing Valerie's face and hands and warming them up a tad. Not all the way back to normal, but enough to sell the cold blue without Valerie looking too cadaverous.
We built the light front to back, one layer at a time. I shot at a 250th, to nuke the interior fluorescent lighting, and built the outside light up to a decent aperture. F/8 or /11 or something like that. Then my exposure was set and I just brought the interior lights up to match. No flash meter, no hard numbers. Just work fast and add salt to taste.
It took us about ten mins to set up and another three or four to shoot. The only stand involved was the one outside the door with the warmed up light. The rest of the flashes just balanced on stuff.
Quick and easy, really.
Subscribe to:
Posts (Atom)