Hunkered Down, and 2010-Bound

The twenty three inches of snow we got last week is melting fast after hanging around for a week.

But I have figured out how to put the remaining mounds to good use: We now have a rather large-ish, walk-out Diet Mtn. Dew refrigerator.

The caffeine will be timely and appreciated, as I am spending the week in The Cave trying to knock off my first of three, blog-related New Year's resolutions. More on that in a few days -- hopefully.

But before we head into 2010, one last look at some of my favorite stuff from Strobist in 2009, in case you missed it the first time. (Windows will open in a new frame, so you can 'command-W' to close them and remain either here or in your feed reader.)
__________


On Assignment: Manil Suri
Fifteen Minutes of Fame
Frozen Hummingbirds
Your Basic Freudian Light Stand
Visiting the Large Hadron Collider
FS: Brick 3BR TH, SB-800s Do Not Convey
On Assignment: Desert Falconer
Lighting Edgier Group Shots
Two-Light Techniques: Pt. 1, Pt. 2 and Pt. 3
Now You Can Sync Anything to Anything
On Assignment: Playwright
New Long-form Dave Hill Videos
Trashy Light
Light, in Tights: Bounceman!
Video: Dan Winters, Beyond Lighting
Dean Collins' Hot Lights Bike
Jon Fletcher's Night Shuttle Shoot
The Men Who Flash at Goats
An (as-yet unanswered) Challenge to Nikon
Drinking with Dead Guys: Beers With Vermeer


Have a happy (and safe) New Year's Eve, and we'll see you next year...

-30-

Christmas Lights and Lighting Christmas


So, we're definitely gonna have a white Christmas here in Maryland.

We are buried in snow, with the high between now and Christmas only hitting the mid 30's. That stuff ain't goin' nowhere.

I took advantage of the first pristine evening to do a twilight photo of our house with the Christmas lights, right out of the tutorial that was referenced last week.

Twilight is the magic hour when it all comes together. And the snow is an added bonus, making large, formerly black areas in the photo very easy to compress tonally. You can underexpose it by a full three stops and it is still a rich medium grey.

Or in this case, medium blue. After the light goes down, the ambient shifts to a very cool color temperature. And by shooting between daylight and tungsten WB, you can play the warm against the cool very nicely.

Here, I used a daylight setting, shifted three units to blue -- which is about halfway to incandescent. That left the tungsten lights nice and warm. Our normal outside lights, BTW, are warm CFLs, which are warmer than tungsten with a little green added in.

Other than that, it's just a waiting game. In a rare moment of lucidity, I shot test shots of the neighbor's house through the window from my warm living room until the lighting mix was pretty close. Then I walked out to the street and made my picture within a couple minutes.

(I'm kinda liking this staying-indoors-during-a-major-snowstorm thing -- a pleasant change of pace from the last 20 years of chasing snow art.)


Lighting Christmas

For those of you not around in 2007, we did a walk-thru of how to easily light your whole living room with just a couple speedlights. It is designed for Christmas morning, but is a good technique to know for any time you have to light a large area with mobile subjects. For reference, you can find it here.

If you are expecting lighting gear under the tree, this might even be excuse enough to get to open it a day early -- just sayin'.

In the Hobby house, we are full-blown into Christmas mode right now, so please forgive any delays in moderating your comments, etc. And whichever holiday you may be celebrating this time of year, we hope it is happy, healthy and spent with friends and family.

-30-

On Assignment: Photography for Social Media


I have been getting a new type of assignment over the last few months that I would have never anticipated even a year ago: Shooting corporate headshots and portraits specifically designed to be used in social media.

If you are a photographer who is savvy with Facebook and Twitter, you might do well to hook up with forward-thinking people who are heavy users of social media sites. More, inside.
__________


Ahead of the Curve

For me, the first thought of social media headshots was in an email exchange a while back with fellow blogger Ben Popken. He was sporting a cooler-than-thou avatar pic, and I asked him about it.

He told me that he "had it done," by photographer Nikola Tamindzic [NSFW]. In an instant, this made total sense to me. We register visual impressions in a fraction of a second, and Ben was smart enough to make the most of that for his online presence. Think of the number of images that hit you on a given day, and how efficient you are at making subconscious assessments based on image content and style.


Ben's avatar is current, cool and loose -- a perfect fit for his highly visible job Consumerist. But also is part of a group of photos at the ready for the speaking gigs and TV appearances that are part of his duties.

Take a moment to check out the bottom/right sidebar at Consumerist, which features Ben's headshot as seen above. Just below him, Meghann Marco's photo is also from a pro shoot, albeit a tight crop. It's from a cool group shot by the same photog of the (then) three editors at Consumerist:


The other sidebar shots are more typical of what you would normally see used as a bio pics or avatars. And to me, there's a huge difference in the first impression left by the different types of photos.

Consumerist doesn't have a gazillion bucks to go out and fund a big shoot. But even in 2007, they were smart enough to give themselves an instant leg-up on projecting a cool image.

What's amazing to me is that even in 2009, some much better-funded companies using social media still don't get this. In fact, some companies actually are using employee I.D. badge photos as avatars for their Twitter folks. Talk about penny-wise and pound-foolish.

If you are corporate social media type -- or just very visible on the web in your profession -- how much is riding on that first impression? Should you really be letting some guy down in security make your avatar photo on his ID-O-Matic mugshot machine?


Have a Compass Point

The trio of headshots up top came from a recent shoot I did of a social media team at a financial services company. They work directly with the public, and wanted to project an attitude of being fun, smart and approachable. Not exactly your father's corporate headshot. One of the ideas I tossed up for this shoot was a "Fast Company" look, based on the very smart Biz 2.0 mag of which I am a big fan.

As good as Fast Company is, one of the things that irks me about them is their willingness fall back on the same Jill Greenberg-style cover, say, 6 times a year or so. But that does give them a look, and one that is recognizable to even their non-photographer readers. This common knowledge is helpful in finding a visual compass point before the shoot. And they went for it right away.

I'll confess to having a love/hate thing with that Greenberg style. I like where she starts out, but frequently do not like where she ends up. Way too much over-lighting and post work for my taste.

My preference is to go with the natural, 3-D look of that wrapping style of light, and go lighter on the post work. I'm just not a big fan of the highly Photoshopped, alien-looking plastic skin thing.


Here is a pullback for Suzanne, the subject on the left up top. We kept this lighting pretty consistent throughout the shoot, which involved six people on that day.

As you can see, there is a beauty dish for key, and two gridded strips behind her for separation. Not a lot of juice on the strip lights, either. Just enough to define the area rather than nuking it. What you cannot see is a diffused (bare-bulb) SB-800 close to the collapsible backdrop, and an ABR-800 / Moon Unit for on-axis fill.

That last light is important, as it allows you to dial the contrast up or down as needed right from the camera position. We nixed the fill altogether on Rob (on the right) for instance. And if you don't have a ring you could use an umbrella right behind the camera in a pinch.

This lighting scheme gives a lot of control, as you are pretty much lighting every plane in the photo. Thus, there is a volume control on everything. But by keeping the ratios close, it all just look very crisp and 3-D -- and not so nuclear as in the Fast Company fronts.

The files were pretty close right out of the camera. I only added a little bit of high-pass filtration with hard-light layers to punch it up a little in post.


Bring Some Attitude


In the end, the edited photos set the tone for what should connote a fun, person-to-person feel in a social media environment. So while you should definitely start out with some standard corporate neutrals and smiles, get past that stuff quickly and work a wider variety of expressions. Then you have the ability to make choices in the edit later.

For these, we decided to go with more of an impish, fun look for the avatars, with a range of expressions inside on peoples' profile pages. When you think about it, everything in business comes down to person-to-person relationships. And being willing to open up a little bit in a corporate environment can pay big dividends in social media. It helps that this particular group of people were smart, funny and outgoing.

Which, of course, also makes them the ideal type of person for this job. Clarky, in the center, is hard-core social media. She had tweets timed to drop in while the shoot was happening. (FWIW, I sometimes use Future Tweets to space mine out, too. Keeps me from looking like a freak by dropping in tweets at 3:00a.m. when I frequently am actually awake writing.)


Just Do It.

If you are interested in building a social media portfolio, the best place to start is by photographing people in your circle who are already blogging and/or on Twitter. It's great for them, obviously. And done right, you will already have the beginnings of a viral marketing arm for your work.

Come to think of it, if your goal is to spread the word you might want to find the people who are already social media hubs in your town and work with them right off the bat. Being the chatty, social types they are, the first thing they'll probably do when they throw up the new photo is to talk about and link to the photographer who shot it.

But the important thing is that you get a subject and they get a photo. Lather, rinse and repeat until you start getting a better comfort level -- and a better, more targeted portfolio. Then you'll be ready when the word of mouth starts to come back to you.

This is an area I am interested in for several reasons -- not the least of which is because it is an intersection point for several areas of my professional life. So I have been shooting friends and colleagues to create the beginnings of a body of work in social media.

Which, in turn, has also led me to what I think will be the most interesting project I will be working on in 2010. Not ready to talk about it here yet, but suffice to say that the serendipitous aspect of just jumping in and making things happen can be very powerful.


Your Examples

Knowing that a lot of you are on Twitter, I'd be curious to see some of your choices for cool avatars there. It's a small amount of real estate, but some folks are creating a kickass first impression with it.

For instance, I like Tim Ferriss's avatar, which is perfect for the globe-trotting lifestyle engineer that he is.

Whose avatar -- other than your own, of course -- do you like? Hit us with a comment, and include a fully-formed URL (i.e., http://www.twitter.com/ahetherington) in the comments.
__________

Next: STB: John McIntyre

DIY Awesomeness: Level-Headed Light Stand Mod


We love Reuben Krabbe's lazy-leg light stand mod so much we will be more than happy to help pimp his blatant appeal for new followers on Twitter and Facebook.

This mod is designed for a standard light stand. But for those of you who use compact, 5-section light stands, remember that they work differently because of the 180-degree leg-fold design.

Just eyeballing it, my thinking is that the extra holes on the leg -- going further down the leg -- would have to be spaced much tighter than two inches. (Half an inch, maybe?) I'd line it up and check the angles before drilling. Also, you might have to pull the pin and re-insert it to get it to close completely.

What a great mod, Reuben. Lots of tripods do this, but I have never seen it on a light stand.

[UPDATE: Apparently, Avenger makes a lazy-leg stand. Still liking this DIY route, tho.]
__________

(Via the always excellent DIYPhotography.net, where Udi has lots more light stand DIY stuff.)

-30-

"Donner, Party of Four, Please…"

We are snowbound here at Strobist World Headquarters, 14 inches into a forecast two feet of snow. The whole Mideast Atlantic is getting pummeled.

I'm an indoor cat today, not at all missing the mandatory snow art assignment at The Sun.

We are (I hope) sufficiently stocked up on food, and cracking the occasional "Modest Proposal" sub-reference around the kids. They remain clueless as to why we think that's funny.

Happy to be snuggled up near the fire and working on an OA post for next week. If you are traveling -- in any form -- on the East Coast today, please do so carefully.

-30-

Nikon Shotguns the Web With Goodness

Hey, you.

If you are a Nikon shooter and use CLS, you definitely want to head over to Nikon's site for three new free lighting vids. Heck, even if you aren't a Nikon type, it's worth the watch for the McNally lighting theory tidbits.

There are three vids so far: here, here and here.

Big props to Nikon USA for moving into high-quality, free instructional video on the web to make their customers better shooters. Every company oughtta be doing this. Really.

Not leaving well enough alone, you can also get Nikon World for free on your iPhone/iPod Touch. And if you are on Twitter, you can follow Nikon there, too.
__________

As for the Canon equivalents, lessee…

Oh yeah: Fake Chuck Westfall is busy on Twitter. Mind those virgin ears, tho (or cubicle passers-by) -- as Chucky frequently uncorks the odd NSFW rant.

(Seriously, if Canon or any of the other major camera manufacturers is doing good quality lighting videos, sound off w/URLs in the comments.)


-30-

10m Nikon/Canon TTL Cords Now on Ebay

After several months of use, I am a pretty big fan of my YongNuo 10-meter TTL cord.

Most of the time I do not use it for TTL. But I frequently use it as a rock-solid, quick PC cord that can also handle FP sync when I want to do an f/2.8 portrait, lit in full sun. And if you are using CLS, it is also great for getting the master flash to a place where it can see all of the remote flashes.

The problem has been where to find them, as no one seems to have picked up the ball at retail. But they have finally popped up on eBay in quantity on both Nikon and Canon platforms, and from someone who ships worldwide.

As of right now, the specific pages are here for the Nikon and Canon versions. But those auction listings will change, so you can always search Nikon 10m TTL and Canon 10m TTL to track them down.

Both versions are under $50 USD, with free worldwide shipping.

And if anyone knows of any established retail outlets (as opposed to eBay sellers) who may also be stocking them, please feel free to post a direct product URL in the comments.

(Thanks to Selbosh for the eBay tip via the comments.)
__________


Pixel TR-331 Update

And speaking of remote TTL capability, I placed some first-person review notes (from VA-based photog Don Harper) on the previously mentioned Pixel TTL remotes in the Flickr thread dedicated to that product, where most of the best info is already collected.

And there is another, excellent review in that thread, here.

-30-

On Assignment: What, Me Worry?

When on an assignment, my goal is for the actual shoot to be as worry-free as possible. That's why I try to get all of my worrying done beforehand.

Some people call this as "pre-production" work, but I tend to think of it as worrying in advance.

A worrisome, pre-planning walk-thru, inside
__________


I did an assignment a couple weeks ago for a magazine that I won't name today, as the cover does not come out until next year and it's not cool to scoop a client.

But while the shoot was fresh in my mind, I wanted to run through my advance worrying before the actual shoot, as it is at least as important the time when you are actually taking photos. I will probably OA the shoot when the magazine is published, but for now it shall remain generic.

As someone who came from an environment in which much of the advance worrying was done for me by assignment editor Chuck Weiss, learning how to work out a game plan for before the fact has been a big help.

I would show up in the mornings, get my assignments for the day and hit the road. The assignment sheet was a framework, with most of the details worked out. And beyond that point it was the photo version of "Whose Line is it, Anyway," with photogs reacting real-time to the daily stream of curve balls that were thrown our way.

Which, of course, made the job very interesting, in a can-you-hit-a-curveball kind of way. Nowadays, all of the prep and pre-thinking falls to me. This is good in that it gives you control, but bad in that there are more variables to screw up work through. The goal, of course, being to leave as few surprises as possible for the day of the shoot.


Before the Shoot: A Walk-Thru

The first email for this job arrived from the magazine's art director while I was away in Mexico. They had a quick-turn cover assignment (the subject was to be leaving for an extended trip shortly) in the DC area. They wanted to know if I could I shoot it within a few days for publication early next year.

No problem, I told them. I would be back in town as of next Weds., and could talk more then. So I put that conversation on top of the to-do pile, as it was time sensitive.

As soon as I got back, I got details on the subject and how to contact him. The ball was now rolling, and the clock was ticking, with a couple of days to pull it together.


First: Worry About the Subject

Before contacting the subject, I first found out everything I could about him -- web pages, his personal site, YouTube videos of him in action, etc. Think somewhere between book report and full-blown stalker. The more you know, the better. Not that this is going to give you an amazing photo idea (then again, it might) but it will probably keep you making a completely stupid and irrelevant photo.

By the time I called the subject for the first time, I had a pretty good working knowledge of him. I knew what I would like to do (kind of a hero/epic looking shot, a little painterly, maybe) and where/when I would like to do it. But the "when" part depended on the subject's availability.


Worry About the Location

Not having any access to his normal working environment (this guy typically operates on the fringe of insanity, in some pretty exotic locales) I'm looking for a backdrop to connote water and build on that.

First destination: Google Maps. It's a godsend. I can scout locations -- including user-supplied photos for popular destinations. More important, I can plot sight lines in the direction of sunset on any given day of the year.

I settled on Centennial Lake Park in Howard County, MD as it was near my house and I was pretty sure it would be cool to shoot there. I knew I could get a clean look into sunset with water, so could use the wide variety of light that happens before, during and just after sunset.


A trip to the park with my point-and-shoot confirmed sight lines in the direction of the setting sun. I did a direct flash test of my hand against the sunset, just for a quick look.

I was also able to see what our immediate shooting area would look like, and find an alternate spot in case we had wind. In the end, we went with spot #2, as it was in a more windward direction. This bought us some calm on the water in the foreground before the wind laid down completely.


Worry About Permits

A quick look at the park's rules and regs told me I would probably be okay, as they only required permits for commercial and "instructional" shoots.

Permits are a double-edged sword, and we were potentially in a squishy area on this site. For me, there would be a short-timing issue (we were scheduling fast) so I definitely wanted to work around getting a permit if possible. But a permit also gives you a little ownership of the shoot area, and without that sheet of paper you are somewhat at the mercy of the other people there.

Technically, this shoot is editorial. So I figure we should be safe. But that won't make much difference if the guys who work there look at the lights and decide we are commercial. So I call in, ostensibly to make sure we will not need a permit.

But that is not the real reason I call. The regs already say we do not need a permit. What we do need, however, is the name of a higher-up to throw around in case we get disturbed by site workers while trying to shoot. Then we can say, "Nope, it's cool. We called and checked in, and (Jane Doe) said we did not need a permit because we were editorial."

Note: If you are going to go with this line of defense, it's all in the way it is delivered. Last thing you want to be doing is to be asking for permission again with the tone of your voice. You are merely assuring them that this is not something that is about to add to their day's responsibilities, because someone above them has already signed off.


Park worker: Let me see your permit.
Photographer [with a small wave of his hand]: You don't need to see the permit.
Park Worker: We don't need to see the permit.
Photographer: These aren't the photographers you are looking for.
Park Worker: These aren't the photographers we are looking for ...


Scheduling a shoot on a Saturday when the main offices are closed helps, too. Then they can't call Agency VP Jane Doe and say, "But they have a whole lot of lights and stuff flashing. Sure you do not want us to shut them down just to be safe?"

Funny thing about that, actually. During the shoot we were approached by a group of park workers. As they drove up in the truck and rolled down the window we were lining up the best line of BS we could muster. Then one leans out of the window and yells (and I quote) "Hey, look at these mother f-----s!" before driving off.

(Translation: It's close to quitting time, and we don't need the extra work of trying to figure the situation out.)

Perfect. But we were ready whip out some Obi Wan if necessary.


Worry About Logistics

Back on the planning front, we call our subject and get a date and time locked down. There is flexibility here, so of course we are gonna sked it to happen through sunset. That's a major advantage compared to getting your assignments all cut-and-dried. Take the timing reins when possible to get yourself the most chance of a good picture.

After locking down a place and time, I post an open call for VALs/assistants on both the location scout photo photo page on Flickr and on Twitter.

Alas, Flickrmail was borked for some reason (imagine that) and no responders got my follow-up mails. But Twitter backstopped it nicely and we had three sherpas assistants (Les, Mark and Linh) for shooting and some decent pizza after. (The magazine's budget was not assistant-friendly, but a location shoot and pizza is usually a pretty cool way to spend an evening. I generally enjoy being on either end of the equation.)

Next step: Send out a Google Map to all, with exact locations for shoot and place to park. People can pull directions from their home this way. Everyone gets everyone's cell number, email, etc., too.

And even with that level of info, pad the schedule If possible. Leave time for things to go wrong. They usually will, in some way. If you have planned for it, no big whup. Our subject was about 30 mins late, but we had planned for that. We only missed some late afternoon light, but still had him for the twilight transition.

Interesting note: Photographer Robert Seale sometimes takes it a step further, sending a car and driver for his subject. That is a very gracious-looking perk, for what is essentially a kidnapping -- and total control of your subject's whereabouts. Smart.


Worry on Paper

At this point, I have already begun a notebook for the shoot. Just a pad that stays with me and soaks up every idea I get for the shoot in the few days leading up.

This is maybe the biggest help of all of my advance worrying. Just having that pad/iPhone/back of your hand/whatever to jot down ideas allows you to just keep stuff percolating in the back of your mind and grab the good ideas that come along.


Worry About the Comp

I had the mag send me pdfs of several past covers. This lets the AD show me what he likes, and lets me see the range of what has been deployed in the past WRT logo, blurb space, etc.


This was very important in this case, as this particular mag has a humongous logo up top, and it will really dig down into the composition.

Can we float the head into the type? Yes we can, they say, into the bottom half at least. (That helps some.)


Worry About the Photo and Lighting

Any photo/lighting ideas I get within the next coupla days will go into this notebook, in very basic shorthand form. I want to be able to create a few different looks in short order. And having a playbook to go to will keep me from spazzing out with no ideas at the shoot.

The point is to have a script of ideas at the ready, but still be open to improvisation.


And every photo idea has a lighting scheme attached to it. This helps me to plan for what lighting gear I will need, and keeps me both from not having something and from overpacking. Well, too much, anyway.

This also helps me to previsualize the final image, for a better compass point when designing the light at the shoot. And I can group ideas into similar lighting themes, to allow me to swap out very efficiently at the shoot if time is short.

In the same way I might diagram a photo after the fact for this blog, having those diagrams pre-drawn is a big help. Those ideas, on paper, help to clear my thinking and to help others with the lighting setups if we are moving quickly.


Worry About the Gear

My approach to gear go with the lightest pack that includes no single point of failure. I.e., no one thing can break and kill the shoot. Since that usually means backing up lights somehow, it also give me the ability to improvise on the scene.


For gear this time, I am light on cameras and glass and heavier on light. One body to shoot, one backup body. One long zoom and one short zoom. One point-and-shoot to use as a setup camera and/or BTS video camera if we want.

The zooms meet up at 70mm (one 24-70, and a 70-200) so if one goes bad I can shoot at 70mm. Just fine for a portrait, worst case.

Lighting is more complicated. I have monoblocs, which gives me redundancy. (If everything runs through one pack and that pack goes, that's a bad thing.) I just take one extra mono than think I will need. But power is a weak point -- I only have one Vagabond II pack because my second inverter borked and in for repair.

So I shove four SB-800s in to the camera bag, and throw a few umbrella adapters for them into the stand bag. Now, even if the other Vagabond fails, I will be okay. I will just have to wait until the ambient gets a little lower to overpower it.

Speaking of lighting -- bringing along an AA-powered, strong LED flashlight means I can focus on the subject's eyes well past sunset and into the dark. You only forget that one once, and never again.


Shoot Day: No Worries, Mate!

Some stuff defies pre-planning. On the scene, we had a couple of lookie-loos who literally wandered right into the lights, checking stuff out.

"What's that? An AB800? Why, Iamthinkingaboutgettingoneofthosemyself. Excuse me as my curious young offspring steps right up and starts touching the gear! Nevermind the potentially fatal voltages -- if he gets electrocuted I can make another one just like him!"

Yeesh. That's a downside to working without a permit -- it is difficult keep people out of your shoot. So we talked with them for a coupla mins, stayed diplomatic, then invited them to watch. From a distance. Like, over there, behind that bench. Or maybe from across the lake.

At about sunset, a friend biked by with her always-present iPhone. Thus were photos of our in-progress shoot ported to Twitter before we were even halfway finished. Felt like we were on The Truman Show or something.

But for the most part, all went well. And in the end the smoothness of the final shoot was largely a result of the many layers of worrying that went into it.

Canon G11 Review, One Month In

The Canon Powershot G11, the latest evolution of the G-cam line, represents a marked improvement over its predecessors -- which is really saying something.

It is a point-and-shoot that can take real photos, and quickly has become my near-constant companion. With its hot shoe and easily fudge-able sync speed, it is a great second body for those lighting photographers who also like to travel light.
__________


On the Street

As the Powershot G line has progressed, Canon has embraced knobs right alongside the menus and submenus. This makes for quick, intuitive operation for an old fart like myself.

It's a capable, multi-purpose still and video camera that doesn't make me feel like an idiot when I use it. And I would take it as my only body on a two-week vacation without a second thought.

The new, articulating viewfinder is surprisingly helpful when street shooting, too. Shooting from the hip -- literally -- is a breeze. Which is a good thing, because like the other Gs before it, the G11's optical viewfinder is pathetic and useless. I actually chose the G7 in part based on that feature and have used it, maybe, twice with the G-cams I have owned since.

The swiveling display screen also is fantastic for shooting video, and/or including yourself in the frame. It adds some thickness to the body, granted. But to my thinking, that also adds a little more stability at lower shutter speeds.


One Big Improvement

The huge knock on the previous G camera was their low performance at high ISOs. The G11 has sacrificed the pixel count in favor of fewer, higher quality pixels. I found the higher ISOs to be much better than my previous G9, and did not miss the extra image size at all.

It's hard to quantify the difference grain and quality, so I will say it in the same way many others have. IMO, it gives you a one- to two-stop improvement in grain.

That is to say, performance at ISO 400 is better than was earlier performance at ISO 200. That seems to be the general consensus on the other reviewers, and I agree with them. For example, the cathedral interior above was shot at ISO 800. (Click on this or any pic in this post to get through to larger sizes if you want to pixel peep.)

Hopefully, the megapixel race is now dead, and camera manufacturers are starting to learn that we care more about quality than quantity. 'Bout damn time.


Kinda Flashy, Too

The hot shoe and manual control, of course, is why so many readers of this site go for the recent Canon G cameras, and the G11 works pretty much the same as the earlier ones did. Which is to say, it works great.

When the flash is turned on, the camera self-limits to 1/500th for synching. But when you turn the flash off the hot shoe is still live, and will technically sync away at any speed.

A few caveats:

First, sticking a recent Canon external flash on the hot shoe will trigger some TTL/etc. communication with the camera (it will run an STE-II trigger in TTL) and that will self-limit to 1/500th.

The trick is to fool the camera by synching in a dumb way -- on-camera (non-Canon) flash, hot shoe to PC adapter, non-Canon TTL cord, or a wireless remote.

Hardwire is best, as there is always some latency involved in a wireless remote that will rob you of a little marginal ultra-high sync speed. With a PW Plus II or a RadioPopper JrX, depending on your flash power setting your max useable synch will be between 1/500th and 1/1000th. The delays introduced by the electronics cost you some sync time.

With a PC cord (adapted with a Universal Translator) I got good synch on modest-power pops right up to 1/2000th. That makes for some daylight-killing speedlights. So if you want the most power out of your speedlight at the highest sync speed, go with a corded sync for one light and slave your others. SB-800s work great for this.

That will get you the most flash energy synched at the highest shutter speeds, by far. Using a corded main flash and a slaved secondary, I was able to get nearly all of the energy of a 1/8 power pop from the slaved flash at 1/2000th of a second. That includes the minor delays by the slave in the equation.

That test tells me that I could hard light, with multiple flash, at reasonable portrait distances at 1/2000th at f/8 at ISO 80. That would be underexposing full-sun ambient by over two stops.

Second caveat is to remember the laws of physics, in that it very much helps prevent your foolishly trying to break them. If a speedlight takes 1/1000th of a second to deliver the energy in a full-power pop, there is no way you are going to squeeze that into 1/2000th of a second shutter opening, ever.

Synch has nothing to do with it at this point -- the pulse is actually longer than your exposure. Rule of thumb: Assuming your camera does the cool overclocked sync thing, as you walk up the shutter speed scale you will be able to sync less powerful pops. It works progressively, until you finally get to a point where you can't synch anything due to various limitations.


Working in manual mode with a single available continuous light wall sconce, this portrait of Beth (a student at San Miguel) was pretty quick and easy. We exposed in manual mode for the tungsten wall lamp, rendering the formerly white room black and orange-ish despite the midday window light.

Then a quick, homemade snoot made with black cinefoil kept the key light (a PW'd SB-800) restricted to Beth's face.

Because we moved Beth a couple of feet away from the wall, that left some room for the key light overspray to travel down behind her and hit the wall at about torso height. This made a neat little separation light that almost looks like a second flash working in the back.

With the Canon G11 and a single SB-800, this was a quick-and-easy lit portrait that could have been made out of a waist pack.


Anyone Else Out There?

Those are my thoughts on the G11, after a few weeks and many photos. If you are using one, I would love to hear your thoughts below, as would anyone else considering taking the plunge.
__________


:: Canon G11 ($450 - Amazon) ::

Dan Winters on The Candid Frame

Something to make your 8-hour sentence in the soulless cubicle a little more palatable today: An outstanding, long-form audio interview with photographer Dan Winters, by Ibarionex R. Perello.

You can stream the audio here (right click to D/L) or listen in iTunes here.

Lots of other cool interviews on The Candid Frame, too. And you can subscribe through the iTunes link above.

BTW, the Dan Winters book pictured above is just fantastic. My absolute favorite monolith in years. Highly recommended.

(Thanks much to Rich Bianchini for the tip via Twitter.)

-30-

As if Merely Drawing Lighting Diagrams Weren't Geek Enough …

Janis Lanka and Isa Goksu have released Strobox, a (free) app for the iPhone. With it, you can create lighting diagrams directly on your Precious.

No connection to this site other than the similarity in the name, which is apparently a combination of the words "Strobe" and "Botox" or something. Direct link to app in the iTunes Store, here.

Five-star app rating from me if the next upgrade references the site and can set off a PocketWizard ...
__________

(Thanks to Justin for the heads-up.)

-30-

Five-Minute Portrait, Dean Collins Style


Software Cinema has released another of the 27 shoots on the 'best of' Dean Collins DVD set into the wilds of YouTube, following up on the hot lights motorcycle shoot. And this time it is a 14-min video of an annual report cover Collins did of two airline bigwigs back in the '80s.

Hit the jump for parts one and two, and links to the full DVD set.
__________


(If you are reading this via feed reader or email, click here if you do not see video directly below.)


Part One


Part Two


This particular shoot has a little backstory, at least as Collins used to tell it while lecturing on the road. This is the shoot that was happened upon by a pair of camera-ladened, elderly "lookie loo's" while Collins was waiting for the CEO to show up.

I won't repeat it here, but if you missed it the first time it is at the bottom of the original review of the DVDs.
__________


More info, and another embedded video:

:: The Best of Dean Collins on Lighting - 4 DVD Set ::

Multumesc, and Spasiba

Thanks to the concerted efforts of several multi-lingual readers, Lighting 101 has been released in two more languages: Romanian and Russian.

The Romanian team included Christian Vladoaica, Anica Pandrea and Andrei Botesteanu. The Romanian translation can be retrieved as a pdf here, via Mediafire.

The Russian team included Dmitry Mayorov, Irene Ponomarova, Kosmynin Ivan and Max Polivanov. The Russian translation can be retrieved here.

Many thanks, in many languages. (And cool design, on both!) More L101 translations are in the pipeline.

-30-

On Assignment: Prep Quarterback

I love football.

My first 50 or so assignments as a stringer for the Leesburg Commercial in central Florida in the early '80's were high school football games.

We were shooting in towns like Eustis, Umatilla, Tavares and Groveland, who at that time could claim exactly one McDonald's restaurant between them.

It was small-town (but not small-time) high school football. The fields were hideously dark, the action was great and the Commercial's deadline wasn't until 9:00 the next morning.

That's because the paper was a PM daily, which meant we could print in the darkroom all night long while eating cold pizza and watching bad movies on our safelight -- a 9" b&w TV with a dark red gel over it. I was in heaven.

And as much as I liked shooting college and pro football later, I always loved shooting preps just as much if not more.

Earlier this season I shot Damascus (MD) High School standout QB Connor Frazier for Rivals.com, dragging out my then-new AlienBees to overpower the mid-afternoon sun.
__________


Tear it Down, Build it Back Up

When we got to Damascus High School they were in mid practice. So we had a little time to scout a shooting area while they wrapped up. I was with Erik and Dave, two local readers who had answered my standard tweet looking for any VALs who might be interested in helping out with a shoot.

(If you would like to assist or hang out, follow me on Twitter and keep a lookout. I have a project starting up which will take me to many cities, and a local set of eyes and hands always helps.)

The sun was ugly and to our backs, so we walked across the field to be able to turn back and shoot into it. When the sun is not your friend, shooting into it gives you control.

First step, which should be beaten into your head by now: Go to 1/250th of a second. This buys you the best possible aperture for shooting with flash. Then, we knock the ambient down -- way down -- with a closed-down aperture, chimping as we go. Stop when it looks cool.

Next, we'll build Connor back up with flash. This is something big lights allow you to do -- even if you are softening the light -- with ease. We start with what will be the fill light (an ABR800) as we will definitely need to get inside that helmet. A ring light will let us dial that internal detail up or down without casting its own shadow. That's why I like ring fill better than shadow-side fill.

Once the fill is cranked up to where we want it (leaving our pre-set exposure alone, to preserve our ambient look) we can then move on to the key light. That was courtesy an AB1600, in a beauty dish. Not too hard, not too soft. And again, we dialed up the power on this flash until Connor was lit to the proper exposure against the suppressed ambient background.

For just a smidge of added dimension, we used a VAL'd SB-800 speedlight at back camera left to throw a little edge light on the left side of the ball and the helmet. It's a little thing -- and very subtle on the exposure -- but I think it makes everything look more crisp and 3-D.

One other thing -- we overclocked the sync a little bit (1/320th, maybe?) to get that unsync'd zone across the bottom. Gave us a little more control over the sun and kept that white jersey from walking your eye right out of the bottom of the photo.

Here is a setup shot, which shows just how contrasty and crappy our straight ambient light was at the time:

That pic (courtesy Dave Kile) does not include the VAL'd SB-800 -- it would be coming from just out of the frame at left.

One thing you can see here is that I have detached the ring light from the camera so I can feather it up quite a bit. This allows me to keep the bottom of the frame, which is much closer to the ring light, from getting too hot. Actually I feathered it a lot higher than in this photo. But you can see the disconnect from the lens axis and the light axis, which is what is important.


Portrait and a Headshot

The job called for a single portrait with a little space in it. But I always include a tight headshot, for several reasons.

Number one, headshots get re-used -- a lot. That was something I learned freelancing back in college when every penny counted: Always make a habit of including an extra headshot. Do it often enough and you will be rewarded by little surprise re-use checks for years to come. They are never big, but then, it's found money.

Plus, a headshot, lit well, can also morph into a cover if need be. And those checks are bigger.

The sun was getting a little lower so that gave us some options. We scrounged a shipping container (naturally, on a football field, right?) as a shade/sun background and went to work there.

I say shade/sun because the container was in shade but the area in front of it was getting sun rim light. That's gonna make this headshot easy-peasy-lemon-squeezy, as the gecko says.

The whole thing is built on that ambient rim light. We put it over his camera-left shoulder and dropped down the ambient exposure until the color was rich and the rim lit area was just losing detail.

Here's the setup:

In the past, I generally would have the key light and the rim light coming from opposite directions. But lately I prefer to key and rim from the same side if I have detail and separation on the shadow side. Just makes for a cooler looking wrap, I think.

So we brought the beauty dish in from upper camera front left and cranked it up until his face looked good. Notice -- no flash meter. Again, it's just an add-salt-to-taste progression that goes very quickly and leaves you the natural option of doing something other than the "perfect" flash exposure.

I used to obsess about perfect. Metered to a tenth of an f/stop. (Screw The Force, Luke. Trust your Meter.)

Now, I could give a rat's butt about "perfect," preferring to go with what I think, looks best. It's the relationship between the different light levels that matters, anyway. And if you always go for perfect exposure values (as conferred upon you by your Almighty Flash Meter) your photos start to look a lot alike.

That's another reason to embrace a little randomness, IMO. Make mine al dente, please.


Here's the final. It's a quickie headshot that will look fine as an inset mug, but could do more if asked. And who knows? Connor might go on to be a hotshot NFL QB. So a badass-looking high school headshot might be a good thing to have in ten years.

(We did a looser version, too, but I prefer the headshot.)

Is it a "perfect" exposure as defined by a flashmeter? No clue.

But I like it, and I am a Committee of One where exposure is concerned. (It passed, unanimously.)


Football Football Football Football Football

Now that I am no longer spending my fall Saturdays away from the family shooting college football for the paper, I have had the chance to go from being a mere Florida Gator fan (my alma mater) to being a crazy, raging, full-on brainwash-your-kids Florida Gator fan.

But long before I went to the University of Florida, I was an University of Alabama fan. Way back in the days of Major Ogilvie, I wore Crimson and yelled "Roll, Tide!" from first snap to final whistle. And during the years I shot for the paper at UF, road trips to 'Bama were my favorite away games to shoot. Great teams, great fans and great parties afterward.

On Saturday, my two favorite teams, both undefeated and now ranked #1 and #2, will play each other in the SEC championship game. The winner will go on to play for the national championship in January.

I will admit to being a little conflicted. But not much.

On Sunday I will go back to being a fan of both teams. But until then, Go Gators. Beat Alabama.
__________


Next: Shooting for Social Media

An Exercise in Seeing Light

This time of year, I usually take a moment to point to an archive post from 2006 on how to photograph holiday lights.

It is a fun (and festive) exercise in getting a feel for how your camera sees relative light levels differently than you do.

In addition to being a good excuse to spend a little quality time with your family, the improved understanding will help you better understand ratios and light levels for your own lit photos.

-30-

First Look: Pixel TR-331 TTL Remote Nikon Triggers

UPDATE #1: Full manual has been uploaded (as a .jpg) here. Off-camera TTL flash is easy to figure out and works pretty well. But iTTL (i.e., master/slave TTL multiflash) continues to elude me.

UPDATE #2: We have our beta tester. Please, no more volunteers...

Just got in an early set of Pixel TR-331 (Nikon compatible) TTL remote triggers. First look, and a call for local Baltimore/Washingon TTL Nikon shooters who might want to give them a test drive this weekend, inside.
________


First Impressions

Right off the bat, they look a couple of notches above the typical "eBay" remotes in build quality. These guys are tight, and built solid.

All TTL connections are hot-shoe based and very solid. There are screw locks and locking pins. Your flashes will be secure.

Right now they only have Nikon models, but Canon are supposedly coming early next year.

They are essentially a wireless TTL bridge, supporting TTL flash and high-speed FP sync. They can also be used in manual mode as dumb triggers. You can use manual mode in FP sync, too.

Quick testing showed them to be pretty reliable. Not rock solid, but neither did they miss very often. I'd put it in high 90's for normal working distances.

I have one transmitter and two receivers, and found I could vary the TTL output level at the physical setting on the flash itself to easily create ratios between the two flashes.

TTL results looked to be just fine, although I am not generally a TTL shooter so I do not know whether the remotes or the internal camera TTL systems get credit for any exposure variances.

I tested it in FP mode and got reliable sync speeds right up to 1/8000th of a sec. Because of the way FP sync works (using pulses) the power levels of the flash were predictably lessened as you walked up the shutter speed scale.


High marks for the supplied sync cord choices. You get two screw-lock PC-based cords which will connect the remotes (in dumb sync mode) to any flash which syncs off of a 1/4" or 1/8" jack.

Frequency on the unit is 2.4Ghz, which means it'll be cool to use anywhere in the world with regard to various countries' radio frequency allocations. But you will also be competing with the likes of cordless phones, wi-fi and microwave ovens. FWIW, I was testing these indoors about 15 feet from a wireless router and getting good sync percentages, tho.

Biggest irk, given that I have not yet been able to test them thoroughly, is that they run on (for me) hard to find CR2 batts. These are sub-sized and 3v.

I spent two hours hitting two Targets and a Wal-Mart with no luck. Finally just had some shipped from Amazon. Pain in the butt. I sure do wish they would sacrifice a little form factor and go AA's. You get way more battery life and universal sourcing on the batts.

Lastly, the instruction manual is predictably funny and confusing -- and replete with (presumably machine) translation hiccups. Actual line in the manual:


"This is electronic products accessories, some of the environment causes may affect the working. However, this is hardly ever to get this situation. Don't Worry!"

Okay! I won't!


Calling Local Beta Testers

[UPDATE: We have our local beta testers all lined up -- to professional shooters in NoVA who use Nikon TTL frequently enough to eval them way better than I could. Thanks to those who volunteered! -DH ]

If you are local to Baltimore/Washington and would like to give them a full test drive, I would be happy to lend them out for a few days. I am booked solid well into next week and will not be able to give them the testing they deserve in a timely manner.

Here is the deal:

1) You should shoot Nikon, and be familiar with Nikon TTL flash. One of my weaknesses in testing these is that I I do not know if any inconsistencies are coming from the remotes, the camera, the flashes or the idiot pushing the button. I am a manual guy. You should be familiar with Nikon's TTL results.

2) You should be willing to pick them up and drop them off in Ellicott City and prepared to shoot over the weekend.

3) You should be willing to supply pics and your impressions of the units' performance.

4) Preference will be given to more than one person who may wish to work together, for diversity of opinion. So if you normally hang with a local meetup group or a shooting buddy, that would be ideal.


For time purposes, I can only choose one beta tester, and will pick from volunteers based on the above criteria by midday Thursday. If interested, please mark your comment as "Do Not Publish" and leave email and phone number as contact. I will update this post after I choose someone. (Got 'em. -DH)

Of course, I will relay the shooter(s)' pics and findings in a future post.


Obligatory Lighting Geek Stuff

Thought some of you might be interested in the makeshift printer paper studio I just used to shoot theses.

Everything is on manual, mostly around 1/64th power. I tripped them with low-power, onboard flash on the Canon G11 point-and-shoot I used to shoot the pics.

If you need to shoot something small quickly, printer paper and small flashes are your friends.

Choosing Big Lights: AlienBees

The last installment of the Big Lights series is a look at AlienBees, a very popular line of studio strobes available in the US -- and recently, in Australia/NZ. But before I get into them, I will preface the post with this:

Early this fall when it came time for me to pull the trigger, I was having a very difficult time deciding between the Elinchrom Quadras and the Profoto Acute line. So I decided to go with a very comprehensive set of AlienBees.

Confused? Lemme explain…
__________


An Inexpensive Way to Learn

Having spent a significant amount of time deciding on which line of flashes I was going to marry, I realized that my main unknown was not so much the gear itself but rather my not knowing what kind of a big lights photographer I was.

My experience with the bigger flashes falls mostly in the neighborhood of nuking large areas -- gyms, large interiors, etc. And that is not the kind of thing I want to do, going forward.

I had grown much more comfy with my SB's than I was with my WL 600s, and that scared me. Not from a standpoint of inexperience but from that of not knowing exactly how to distribute what would amount to a big chunk of cash when buying lights.

So I decided I would date the AlienBees before deciding which flash system I wanted to marry. And who knows, if the AlienBees proved sufficient my wallet would come through the process largely unscathed.

And not knowing what I wanted, I bought ... everything.


Cheaper by the Dozen

By themselves, the lights and modifiers are inexpensive. But there are also quantity discounts to be had. Buy four flashes, as I did, and you get 20% off of every accessory you purchase at the same time. Which almost makes them free to test drive.

This is because, unlike your late-model digital camera which just lost $100 in value as you read this sentence, flashes hold their value very well. And new gear bought at a 20% discount will pretty much get you your money back on eBay whenever you are ready to sell. Which was my plan.

I bought three AB800s, an AB1600, stands, booms, strip boxes, a soft box, beauty dish, grids for the boxes and dish, tele reflectors -- pretty much everything that was for sale on the site, it seemed.

I did skip the remotes, as I am already full up on PocketWizards Plus II's. But when I was done I still had not managed to rack up a $3,000.00 total, as the 20% off added up to some pretty big savings.

And why not go crazy? My thinking was (and still is) that I could use them for months at almost no net cost. And if I liked them enough, I was done with my flash search.

It was a pretty heady day, getting the contents of a full studio delivered to the front porch by the UPS man. And over the last few months, I have learned a lot about AB's -- and about myself as a lighting photographer.


Likes, Dislikes

There is a lot to love about the ABs. At the top of the list, of course, is price.

You can get an AB800, with reflector, power cord and sync cord for $280.00. Which is about what it costs to see a movie in New York City. You can get the AB400 for $55 less, but that is a very small difference for one full f/stop. My advice is to skip it and go for the AB800.

This is ridiculous, silly cheap for a studio flash. So much so, in fact, that it has sort of blown the curve of what people think is an appropriate amount of money to spend on a big flash. Paul Buff sells direct only and manufactures by the boxcar load. He has created an entirely new business model in the industry.

Are they built like a Mercedes? No, they are not. But their service/repair policy is so generous that it does not really matter for many people. And they are sufficient for most uses, and that is what matters to their owners.

Buff also extends that "built good enough" ethic to his modifiers, with mixed results. Soft boxes, the dish, grids, and many other items I have found to be first rate and surprisingly heavy duty. The stands are serviceable, but are not what you would call confidence-inspiring. Also, his standard reflectors are ingeniously designed to accept a 7" grid without an accessory clip. But I would be happier if they were parabolic, rather than conic.

In short, the ABs allow you to jump in the pool for cheap. Try stuff -- heck, try it all -- and see what you end up using and/or liking. I especially like the Vagabond II, a $300 battery pack and pure sine wave inverter which will run (3) AC-powered AB800s on full power for 300 pops.

I bought two of them. I was like a shark in chummed waters -- I got that crazed look in my eyes that my wife gets when Ann Taylor has a 75% off sale at the mall.


What You Won't Hear

While I absolutely recommend experimenting in the shallow-priced AB waters, here is one thing you will not often hear said among AB owners:

"I just love the quality of the light..."

You hear that about Profoto, Elinchrom, Hensel, Broncolor, etc., But when AB/WL people start talking they usually come down to price and/or portability.

And you are not going to hear me rave about the gorgeous light quality either, because ABs do have a bit of quirkiness to them in that department. I can't quite put my finger on it or quantify it, other than to say that I am sometimes a little surprised by what I get from them.


So of course we did some testing. Here is a series, shot all of the way up and down the power range of a single AB800. They are not dead on, but neither are they grossly inconsistent. Maybe it's a UV thing? I really don't know.

And don't get me wrong -- I have been shooting assignments for months with these things with no complaints. And I still do not know if it is the lights themselves, or me not being fully used to them.

There are people (usually from expensive, prestigious photo schools) who turn up their noses and reject the AlienBees out of hand. That's ridiculous. They are the number one selling brand of studio flash, and for good reason. Similarly, there are people who are just as rabid in their support of the units.

I suspect that the truth lies in the middle somewhere. They are an amazing value, to be sure. But they are not the equivalent of a high-end Broncolor system, either.

And frankly, for the money I can live with a little quirkiness. I have some On Assignments coming up on which I used the AlienBees, so I will let you judge for yourself. It is a very subjective thing, light quality.


Want vs Need

What do I want? That's easy -- I want everything.

Which is pretty much what I bought. And exactly what I would not have been able to do with, say, Profoto. Not without knocking off a rich relative a commercial loan, anyway.

But what do I really need? That's a different story.

And that has been the most valuable part of my AlienBees experience -- learning what I need in a big light system as opposed to what I want.

Here's what I found out: Ninety percent of the time I shoot, I am going to be making a portrait and using two light sources. This is proving to be a transportable and predictable workflow from my speedlight shooting. Heck, it is probably because of my background working out of a waist pack that I have evolved that way.

Generally, it will be a restricted key and an on-axis fill of some kind -- ring, light off of a white wall behind me, umbrella behind the camera, whatever. Or maybe I will use ambient as a base and use one light as a key and other as a separator light. Usually as a rim light or a light on the background.

While sometimes I will use a third source, that is surprisingly rare. But having the third source gives you backup on the first two, which is very important. Any system you design should leave you without a single point of failure. Which is one reason I gravitate to monoblocs over pack-and-heads. And why six SB-800s in a small bag are more useful to me than one or two big monos.

Occasionally, I throw a lot of light sources at something. Just once in the last three months, shooting social media headshots for a local financial company, I used five sources. (But that was 3 AB800s, an AB ring flash and an SB800.) So maybe if I went with more expensive lights, I might have to miss out on an occasional job. Or just have to shoot differently. Or rent.

As an aside, the shot above was done using the three lights visible in the frame, and two more. The center light lit the background. The side lights lit each other. There was on-axis light from a ring. And an SB-800 on the ground shot a little up-light kicker to define the lights.

I may stay with the ABs, and I may not. But for less than the price of a single Profoto Magnum reflector, I have essentially been able to sort of "rent" a huge set of lights, stands and mods for months. That rental fee (net buying/reselling costs) was recouped many timed over on my first assignment with them. Which is why I am so pleased to have used them to discover how I want to light.


Learning from the Experience

Using what I learned from my drunken AlienBees gear orgy, I could now estimate with more confidence what I would need to buy should I decide to go with, say, Profoto.

I would want an AC pack, three lights (two regular heads, one ring) some pretty specific mods, and battery-powered packs to power at least two heads. And with the year-end specials Profoto is running, I am actually giving serious thought to pulling the trigger. If that seems strange, remember that I bought the ABs a while back, and that part of my reason in getting them was to evaluate both them and myself as a lighting photographer.

Here is the 40th Anniversary deal that is making me drool for Profotos: If you buy an Acute 600B (battery unit) or an AC-powered value kit, they throw in $1000.00 worth of accessories. Different countries have slightly different rules on the promo, so check if yo are interested.

This bonus appears to be stackable, too. So I could get two 600B packs, and an Acute 1200 value kit. For under $8k USD, that would give me two heads and the ability to run them on AC or battery power. My only single point of failure is the AC pack, and that is covered by the battery units.

And with the $3k USD in free accessories, I could get extra battery modules, a ring light head, a soft ring reflector (working with the Moon Unit has made that a must) grid reflectors and a Magnum reflector. I could get by with my ratty, 20-yr old White Lightning 7" grids that are pictured above. That is a setup I could live with for a long time. And I never would have been able to know that with any confidence without using a wide variety of AlienBees gear for several months.

Would I drop $8k for that? Absolutely.

And I am less concerned about the up-front price than I am about really knowing what gear I want to settle into. This is long-haul stuff -- a marriage. And I still have a month to decide before the special expires.

(Curse you, Profoto, for making the deal last up to the last minute of tax-spending season. That was evil. It's like a month-long test of fortitude, taunting me until New Year's Day.)


Back to the Bees

Do I regret jumping on the AlienBees? Not for a second. They have been very serviceable (not to say inspiring on all counts) and have provided some very valuable clarity for essentially no net cost should I decide to change horses. And I very well may stick with them for the long haul. I haven't decided yet.

If you have access to them (the AU/NZ distributorship is selling to surrounding Asian/Pacific countries, it appears) you can hardly go wrong as an entré into bigger lights. And given that they all have built-in slaves, they will definitely play nicely with your existing speedlights. (AB becomes main light, speedlights become fill/rim/background, etc.)


[UPDATE: The AU distributor of AlienBees confirmed that they are shipping to different countries, which will be good news for some of you who are outside the US.]


They are just so deliciously inexpensive. And with the (upcoming) "Einstein" versions, ABs get even more interesting as the light color issues are supposedly vastly improved. A lot of other improvements coming, too. I'll be keeping tabs on that.


Getting off of the Couch

Yeesh, I feel like I just went through a therapy session. And believe me when I say that is an honest a look as I can give you into my thought process on buying personal lights. And six months after I started, I am both well-equipped and yet strangely in limbo as to what I will do next.

So in some twisted way, I hope that this has been of at least some help. Hell, it probably just left some of you more confused. I am a little conflicted in that I now know enough to have prompted some questions I did not know to ask at the start of the process.

And I hope you AB/WL owners will sound off as to your experiences in the comments, good or bad. This is too important a decision to go on just one person's say so. Your opinions certainly will help others make better decisions.

Please share them with us.

On Assignment: Planes and Arrows

As part of a long-term project I am working on with a local school, I popped into the gym after school recently to shoot archery practice. And it brought to mind a quickie tip for lighting big spaces.

A gym is a big-volume place, full of ugly light. You can't hope to light the whole thing very effectively with a few speedlights. But you can light selective planes and create the illusion that large, 3-D areas are lit -- even if you can only place lights at the periphery, lest your lights get skewered.
__________


Always start with a first look at the ambient. That's what I always do when assessing an area to light. A quick shot on auto exposure and daylight balance lets me know how much ambient there is, and what color it is.

Answer: Not much, and puke green. Perfect.

The auto-ambient is 1/15th of a sec at f/5 at 200 ISO -- pretty dark. And honestly, the darker a big room is (within reason) the better as far as I am concerned. With big areas, I want to give myself a friendly aperture to be able to hit with strobe when I build it back up.


Step two, is to knock out that ambient while leaving myself as much ability to light as possible. So, go to my sync speed (1/250th) and close down the aperture just until the bad things go away. 1/250th at f/6.3 is plenty dark. In fact, I probably still have a stop or so of leeway, in case I need to adjust my strobes' exposure by remote control by just tweaking my aperture setting later.

Just enough, but not too much on your new, ambient-killing exposure. I could easily nuke ambient with f/16 at 1/250th, but then I would have to light it to that level. Not an easy thing to do with speedlights at distance. Make life as easy on yourself as possible.
__________


The trick to working with speedlights in a volume this big is to realize that you do not have to light that whole volume. Just light the planes you are going to shoot -- be they walls, targets, people or whatever.


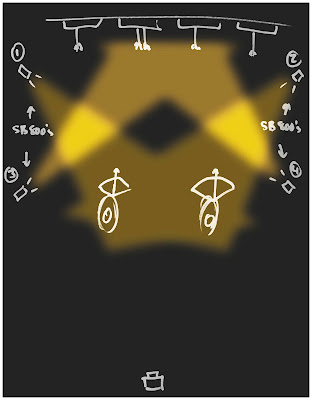
Case in point: Strobes #1 and #2 are lighting my shooters. Not much -- just enough to give them a little wrap detail and keep them from being a sillo. And you could easily light this whole thing with just two flashes if you were cool with the shooters going black. That's a pick 'em, or an easy out of you did not have enough flashes.

The two lights nearer to the camera (#3 and #4) are lighting the targets. I aimed the left flash at the right target area and vice versa, for even coverage.

Setting my flashes on 1/4 power at a 105mm throw, I can easily light up the targets at a significant distance. Ditto for my archers.

Another consideration here is that my lights are lighting both shooters and targets without being in the line of fire. I thought about placing them between the shooting alleys near the arrows' flight paths. Then I watched some of the shooters warm up. Ummm… No.

(They aren't making SB-800s anymore.)

And not that this light is anything major special, either. But remember the sickly pea soup we were in a few minutes ago -- it is that difference that is important to me.


Once we have lit the two planes, I can use the same setup to grab a detail shot, too. And it looks completely different with a longer lens -- almost as if that (now visually compressed) space is not even there.

If I want to adjust the exposure (liking this one a little more saturated) that's an easy fix by varying the aperture. No need to adjust the actual lights, as the whole thing is built on flash.

Your aperture is now your volume control.
__________


Same Principle, Different Approach

This project is activity-driven as far as subject matter goes. But the important part to me is producing a series of portraits of middle schoolers who are mastering their environment. The project will ultimately be aimed at incoming 6th graders, who are looking at middle school with mixture of garden-variety fear, and total, unadulterated fear.

So after the practice, I grabbed a portrait of the best archer in the group. And just like the above photos, this one is built with lighting on planes -- albeit in a different sense.

Their gear is pretty spartan, with nylon reusable targets and arrows of rather dubious fletching. We used three of the better arrows, and posed our archer against the target. There were only a couple of minutes to shoot, as class was ending and he had to go.

The target is much lighter in tone (especially at the edges) than is the archer, and I wanted to switch that relationship around, to place emphasis on him.

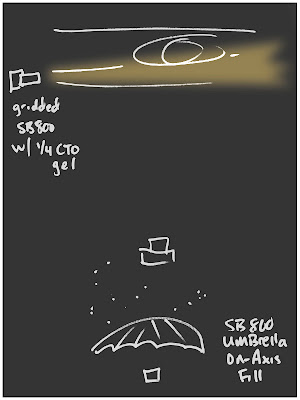
In the same way we can light planes, we can choose to exclude them -- even if they are practically adjacent. The target is lit by an on-axis (or nearly so) umbrella placed behind the camera. By lighting him to two stops down, we provide fill on his face and take the target down to saturate the faded colors while taming the white edges.

Two birds killed with one stone, we light the face next.


As you can see above, even though his face is right next to the target, we can light both planes separately by using a grid on his face and feathering it away from the target.

The important thing to remember is not to aim it at his face, but rather in front of his face. Just skim him to the front, and you can use the edge of the gridded beam to light his face without hitting the target.

(You could also gobo off the light to get this effect, with slightly different results. But I like the way the edge of the beam looks on a face.)

So, we are lighting a face on a completely different plane that is the lighting on the target which is just a few inches away. This means we can gel the face but not the target, which is exactly what is done here. A 1/4 CTO warmed up the flesh tones just a tad, without coloring the background at all.


Plane and Simple

By thinking of your lighting zones as planes, you can bypass large amounts of unneeded dead space. Or you can also be picky about just where your light goes and where it doesn't.

And the efficiency of lighting on planes helps you to easily overcome yucky ambient in large, dark spaces.
__________


Next: Prep Quarterback